|
The vast majority of online resources and discussion relating to F-Class long range shooting are about equipment selection, reloading, and load development. Mastering these aspects of the sport will ensure your rifle shoots a tight group in ideal conditions, but this will only get you started. It is a common assumption that wind reading is the key to long range shooting. However this is not the full story. Reading the environment and making a cold wind call really only happens for the first shot. For the majority of the match, we are building from our previous shots. Every shot is a true indication of the wind, and a chance to learn something about the range. 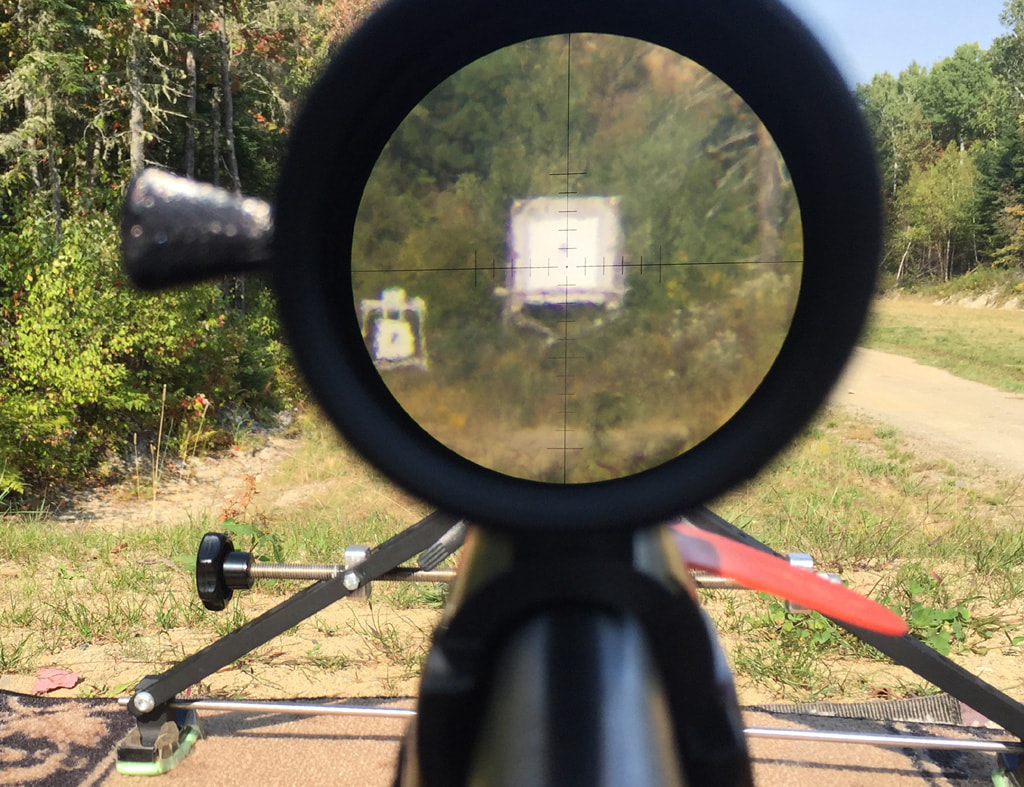 No matter how accurate your rifle is, centering your group is a challenge in heavy mirage. The true challenge of shooting in the wind is to learn on the fly how the wind indicators in the environment relate to where the bullets are going. We need to focus on what is relevant, differentiate random scatter from actual wind changes and keep the group centered. Having a more accurate rifle might save you the occasional point, but longer aggregate scores are decided by whether you can keep track of what’s happening during the key moments when the wind changes quickly and everyone else is dropping points. What is your strategy?How you keep track of relevant information and make decisions on each shot defines your strategy. Every shot we fire in a match provides valuable information. We know where the bullet landed, what was on the sight, and the hold, so the exact setting needed to center that shot is clear. This is the “true” wind condition and is accurate within the natural grouping ability of the rifle. Along with the wind indicators at the time, this is what we have to work with to make an optimal decision for the next shot. To record every detail and run precise calculations would not be practical. Instead, we develop strategies to simplify the problem and focus on specific key points that we think are the most relevant. Knowing what to focus on and what is safe to ignore is a skill developed through experience. 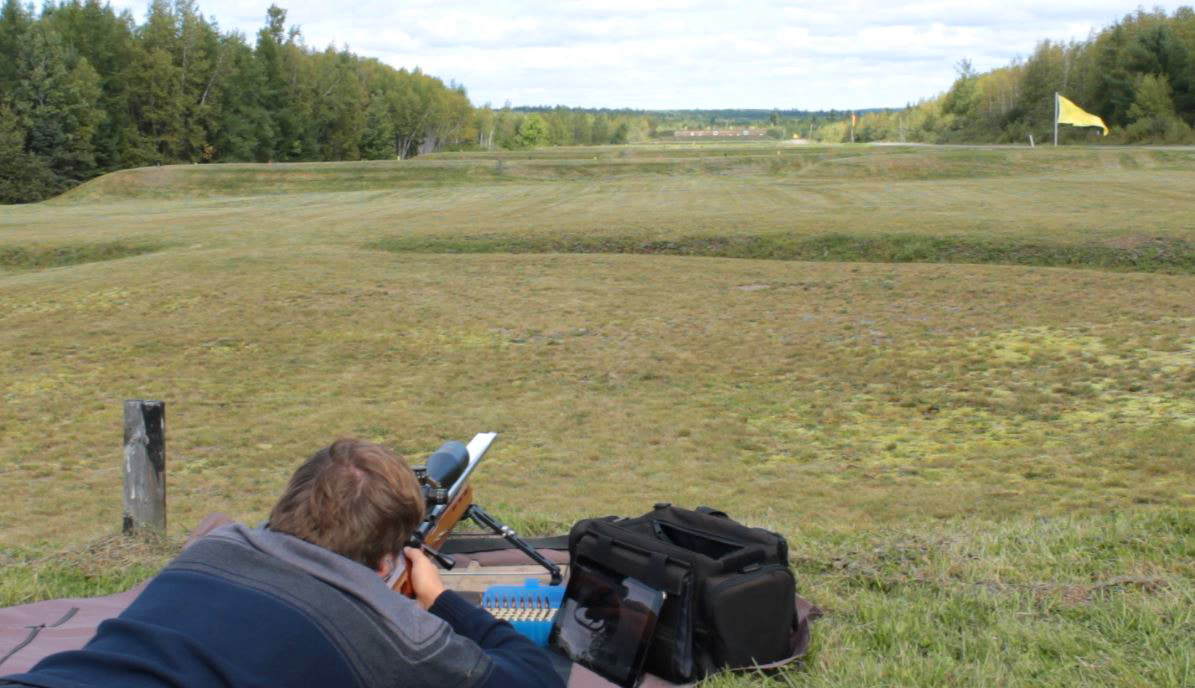 Practicing at 900 meters in New Brunswick. Think about the strategy you use. Do you write anything down? What details do you remember on each shot, and what do you filter out? How do you decide what to focus on? Every routine has tradeoffs, and your methods have developed through experience in the most common wind conditions you encounter. When the rare, particularly challenging conditions arise, we have less experience to fall back on, and the strategy that works well most of the time may not be appropriate. We often lose the bigger picture and need a few shots to get back on track. This is when matches are won or lost. A strategy designed to make the best of the worst situations will allow you differentiate yourself from others and post higher aggregate scores in the long run. There must be a better way!When I first started shooting for score back in 2014 I was taught the Plot-o-matic method on day 1. As far as I knew, this was simply how you shoot. It made perfect sense to me and it was to my surprise that the vast majority of shooters are not familiar with the method. My strategy is now my competitive advantage and the key to how I am able to do so well relative to my experience level. I have hosted workshops and training sessions specifically to teach this method to my fellow shooters. We tend to copy those who win, and once I started winning, people started listening. Those who have adopted it with an open mind have drastically improved their scores and have said they can’t imagine shooting without it now. The Plot-o-matic was originally developed in the 80’s by George Chase (coincidentally also from New Brunswick, Canada) in order to better manage the centering of 2 minute groups from open sight target rifles of the day. While it provides an advantage for any style of shooting, it is extremely useful for F-class. The smaller the target, the larger the relative wind changes, and the greater the benefit to higher precision. 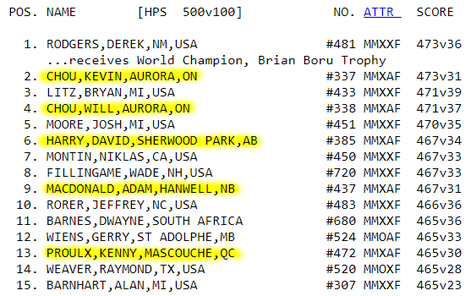 These five Canadian shooters used a Plot-o-matic to finish in the top 15 of the 2017 FTR World Championships. The fundamental concept is to maintain a visual plot of all the previous shots relative to a fixed scope setting. It is not simply a plot of the shot impacts on target. It doesn’t show the score, and it doesn’t show your mistakes. It shows where each bullet would have landed if you had held center and fired blind without touching the sight. It shows exactly how the rifle is grouping and how the wind is affecting your shots, regardless of anything you did, or didn't do, to your scope. When shooting with a plot, your mind is completely free to focus on observing the wind indicators and trying to understand them. You don’t have to remember or think about anything else. The plot shows you exactly what you need to know to make an informed decision. Most importantly, the plot helps keep reality in context when the wind gets out of control. When you lose a few points and need some help, the plot might show you patterns that you missed or allow you to change your approach on the fly. You never have to start over with wild guesses, and you can always recover from confusion. A better way to zero a rifleConsider the everyday exercise of zeroing a hunting rifle. You know you’re going to need to center a pretty large group to ensure an accurate zero. One method is to simply leave the scope alone, and fire some shots into a group. Hopefully that group is on paper. Then measure the center of the group, and adjust your scope at once. Technically, this method is very efficient. Many new shooters actually fire multiple convertible sighters at the same scope setting, trading the potential value of the sighter for the convenience of being able to center two shots at once. This is not a good strategy if you care about points. If we cared about each shot landing as close to center as possible, we would want to make adjustments on every shot. As you may know from your rifle zeroing experience, trying to keep track in your head is pretty tough, or even with a piece of paper. 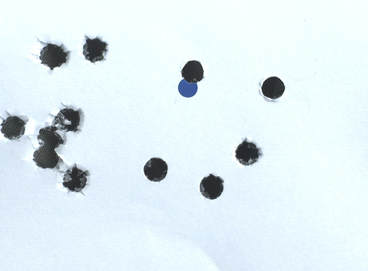 We've all done this before. The middle is in there somewhere... A typical procedure when zeroing a rifle is to keep adjusting one shot at a time until you think you are close, then fire a few more shots at the same setting until you have a group, then make one final adjustment to center that. It works, but you’ve fired 3 or 4 more shots than needed, and the adjustments are not optimal. In a match, we don’t have the luxury of an extra box of ammo. Convertible sighters have value, and they should not be thrown away. It's possible to make optimal adjustments on every shot and maximize the score, but it requires more than a piece of paper. How to use the Plot-o-maticUsing the plot, we can make precise group centering adjustments on every shot, without getting confused. This is exactly what is needed in a match, assuming for now that wind is not changing. The actual plotting tool is made of two layers. First, there is a target. Like a typical paper plot sheet, this target has rings which match the actual target we shoot on, and is scaled according to the distance. I use a magnetic whiteboard with printable magnetic sheets, but you can use paper on a clipboard. 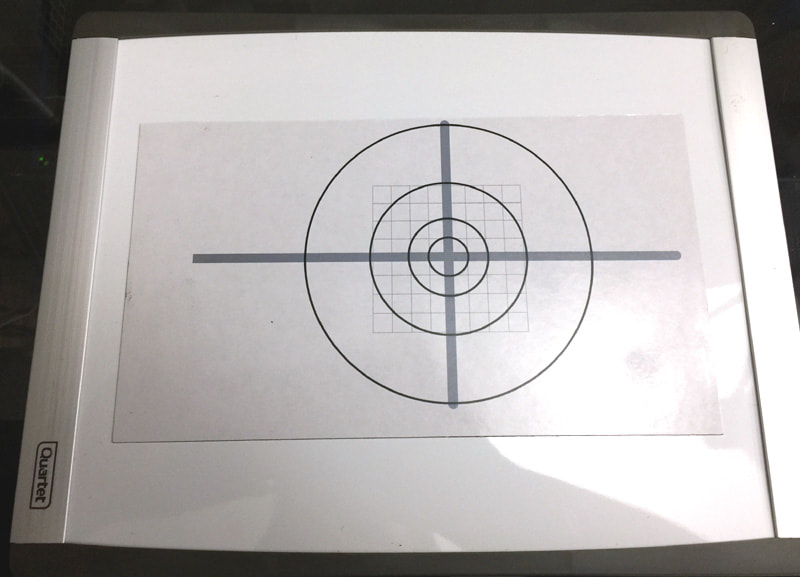 Quartet whiteboard from Staples with printable magnet sheets. In front, we place a transparent plastic sheet with printed hash marks around the edges representing 1/4 moa adjustments. The transparent sheet is held in place with magnets, and it lays flat on the target with no space between for parallax error. 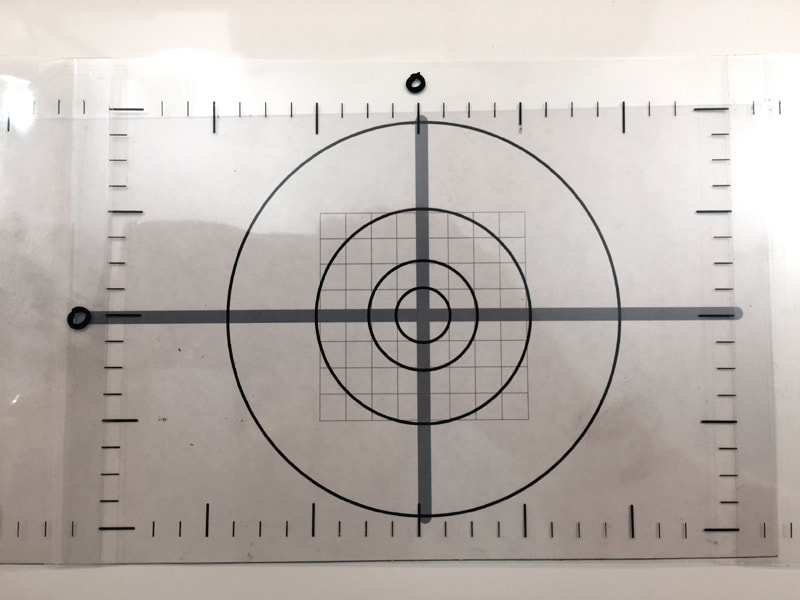 With a dry erase marker, we write the expected sight setting where we think we will need to be to center the group. For windage, this is our expected average wind condition for the match. For elevation, it is best to read the number which is actually written on the scope dial. For simplicity, we will assume zero and zero to start. Next, we fill in a few windage and elevation values to represent other sight settings. Write the numbers backwards, increasing left and down, and you will see why in a moment. 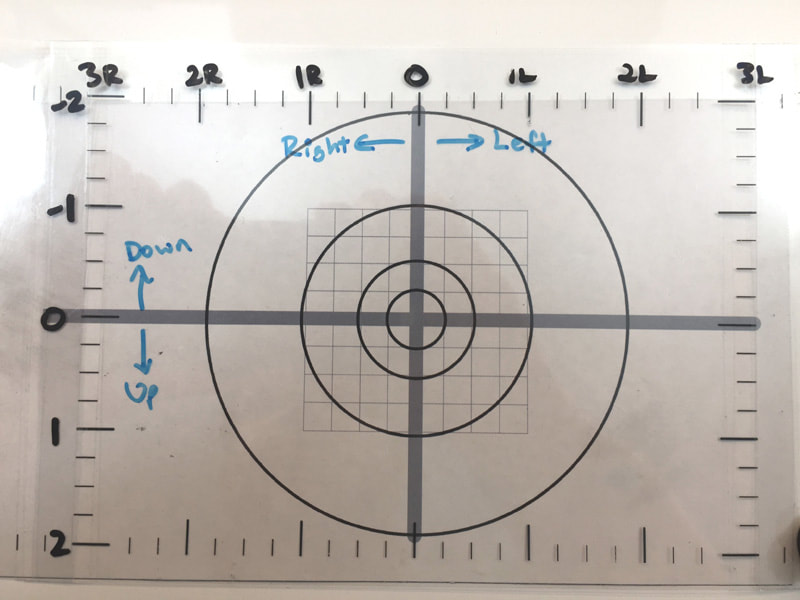 Ready to shoot!Now, double check that the hash marks are aligned with the target and the sight settings match. Hold center, and fire. Wherever the shot lands on target, we plot that shot, relative to the target rings, on the top sheet. 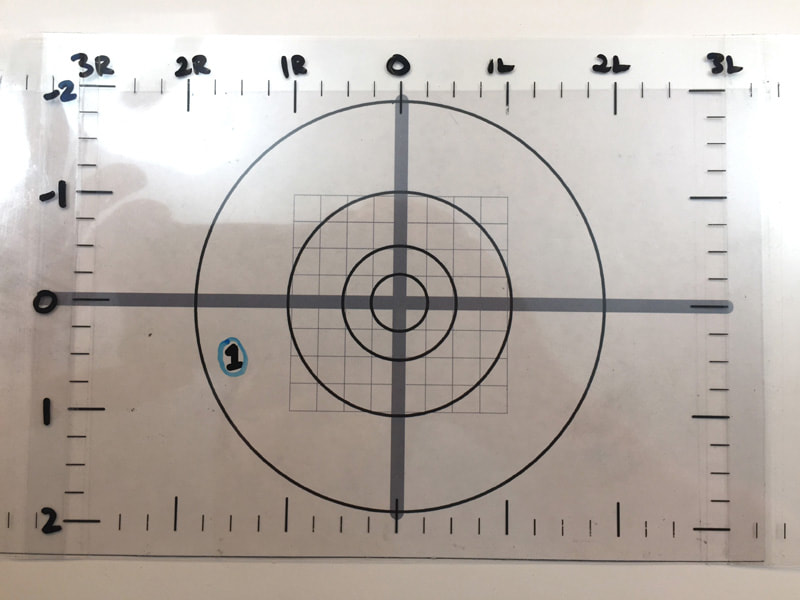 This shot landed about 1.5 moa left and 0.5 moa low. So we would like to center this shot. By centering the shot, we maximize the chance of the next shot landing in the center as well. So we slide the plot up and right in order to place this shot directly in the middle of the target. 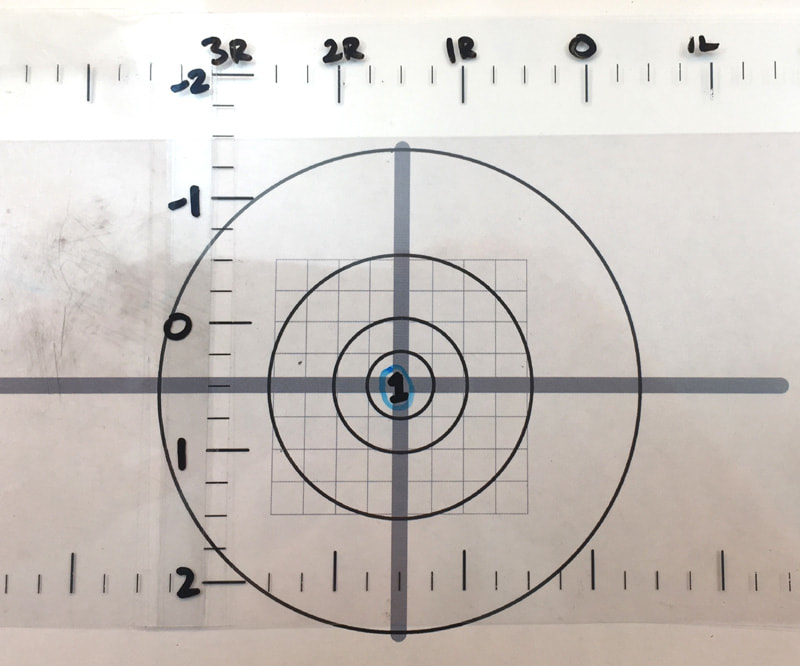 We can see by the hash marks that 1.5 Right and 0.5 Up are aligned with the target, so we adjust our sight to exactly these values. Now it's time for a new shot... 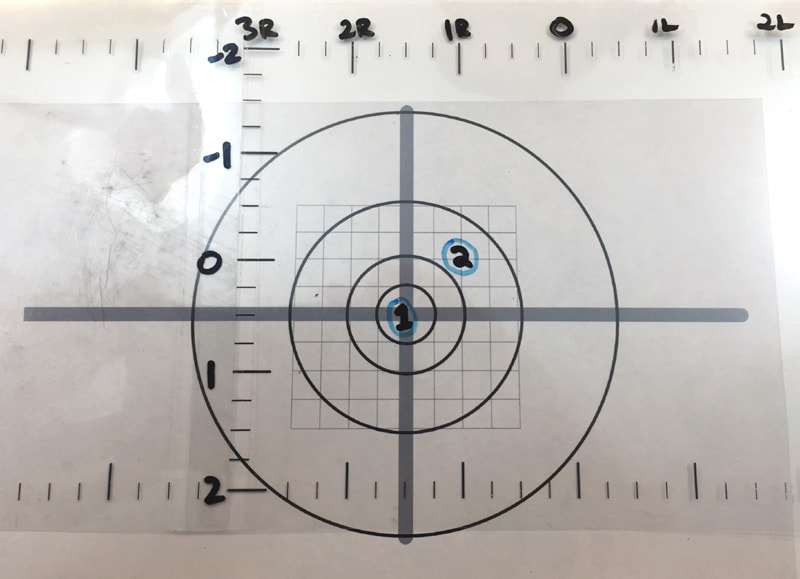 Shot #2 landed a little high and right. We didn’t over-correct, this is simply a random two-shot group. The best we can do from here is center the group, so we shift the plot slightly down and left. 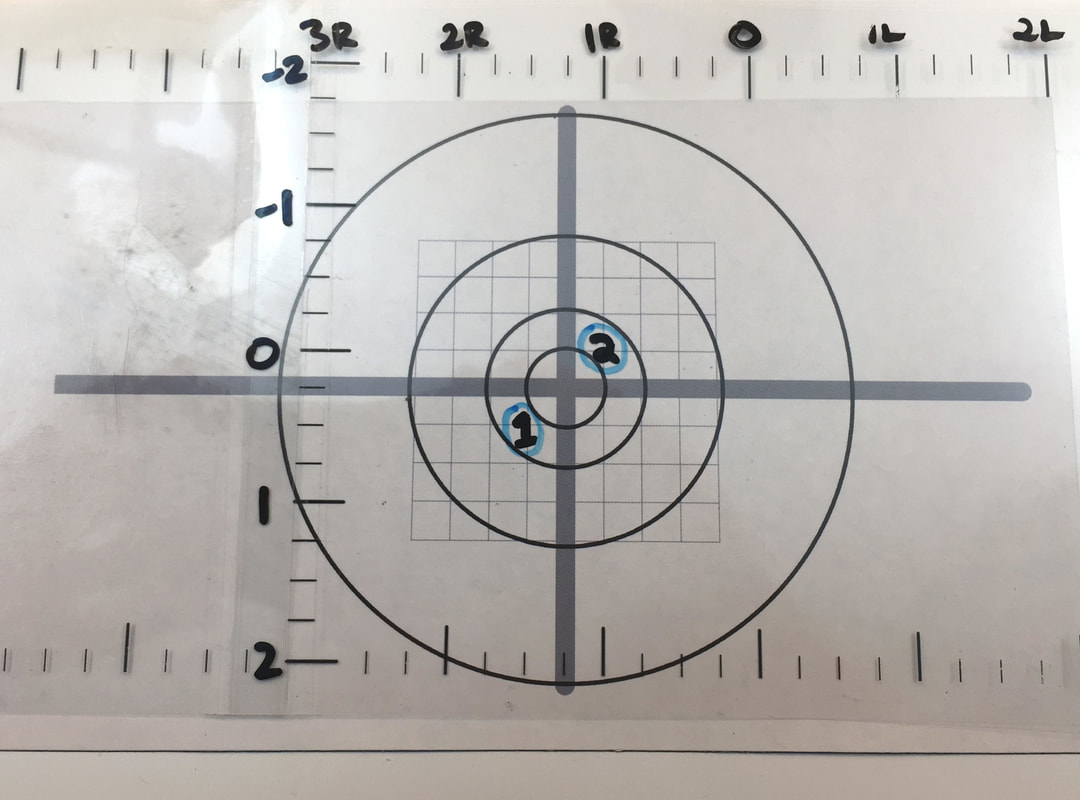 This setting, 1 1/4 Right and 1/4 Up, centers the two shots exactly, so this is what we want on the sight. If we had fired both shots at this setting, this is where they would have landed. This optimizes the chances of the third shot landing in the center as well. Do you remember what setting we fired shot #2 with? Do you remember exactly where shot #1 landed on target? It doesn't matter. As soon as it's accurately plotted, we can forget those details and focus on the next shot. So then we fire a third shot...  Whoa, this one is low. There's nothing we could have done to predict that. In the absence of any other information, we perfectly centered shots #1 and #2 and this is purely the grouping of the rifle. We lost a point, but without knowing the future, there was no better adjustment that could have saved it. Now we have a decision to make. How should we correct after this shot? This shot landed 3/4 moa low, so maybe we should at least come up 1/2 moa? Let's shift the plot up 1/2 moa and see how the group looks at that setting. 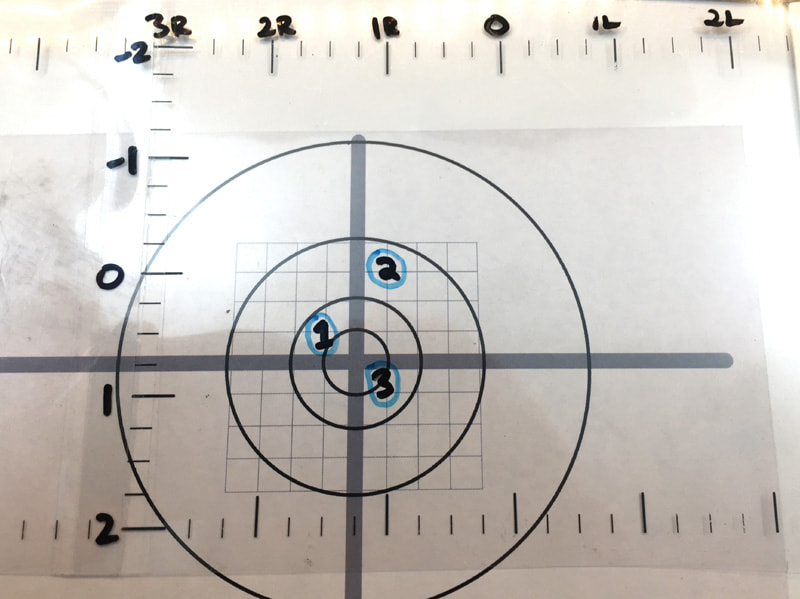 Well, #1 and #3 are centered pretty well, but #2 is way out the top at this sight setting. Clearly this would be an over-correction. It obvious to us, because we can visually see the entire group relative to this sight setting, but without a plot this would be an easy mistake to make. So let's slide back down 1/4... 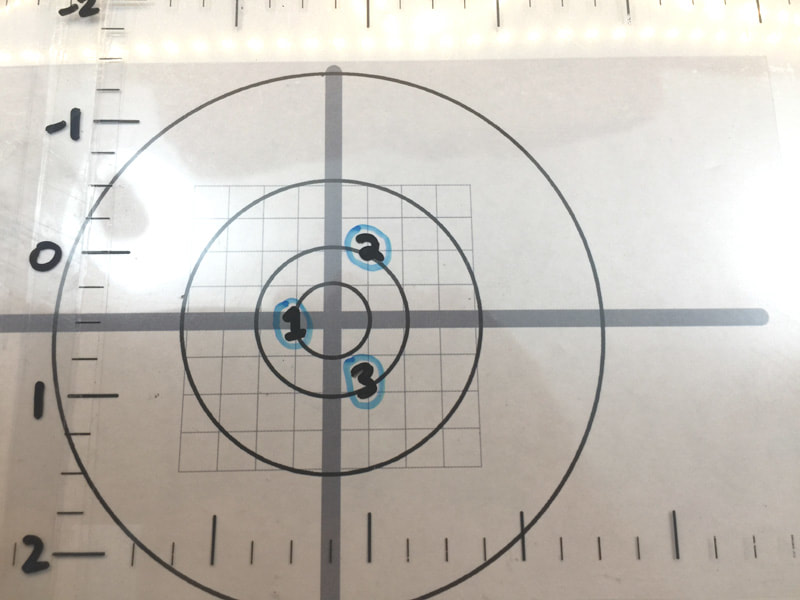 This looks to be the best we can do. All the shots are at least touching the second ring, and our group is fairly centered. Let's fire shot #4 at this setting. 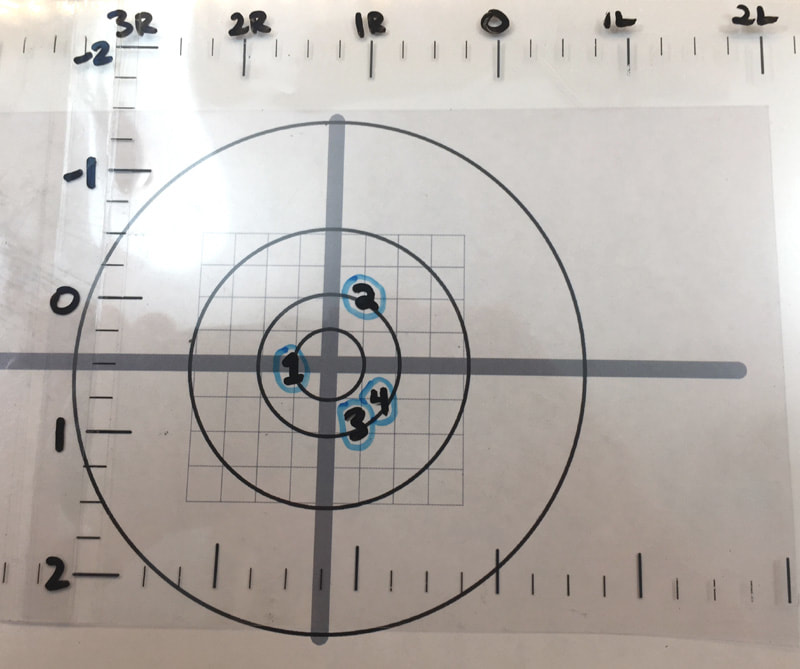 We're in, but that was a close one. Low and right. You might be further tempted to raise the elevation by 1/4. #3 was very low, and #4 is still low. This type of situation can cause disagreement in a team setting. However, with the plot, there is no dispute that #2 is high, and raising the group would bring #2 outside of the scoring ring. This perspective on the past will save points when your rifle is shooting a realistically sized group at long range. Also notice that we don't need to think about the actual numbers that are going on the sight. We make a visual decision, then simply read the hash marks and make the sight match. Let's bring it left 1/4 and shoot again.  Now we have #5 on the left edge. We are bouncing around the second scoring ring, missing the inner, but we can see that the group is filling in and #2 no longer looks out of place at the top. If we center this, we can have fairly high confidence that further shots will land inside. How should we center this exactly? We have a few options...
Comparing the three windage options, it looks like the group in the middle is better centered. The problem is, this requires a 1/8 moa adjustment. If we have a sight with 1/8 clicks, or can hold accurately, we can take advantage of the increased precision. Otherwise, we run the risk of losing a point out either side. You may think 1/8 clicks are pointless, but with a plot, the first time you say "ah, close enough" and lose a point just outside the line, you will know who's fault it was. The plot allows you to see exactly how the group should be centered, and 1/8 adjustments made for the right reasons will save points. Plotting in the windOnce you are used to group centering with a plot, and fit it into your routine, shooting in light wind conditions becomes very straightforward. The plot tells you exactly what to do and you simply run through the motions, gaining a point or two over everyone else because you made statistically optimal decisions at every step along the way. It may sound too easy, but it needs to be, because all of your brainpower will be needed for wind reading. The plot will allow you to focus entirely on interpreting the wind indicators on the range. Let's start with a group of four shots, which is centered pretty much at zero. All of a sudden, a strong wind builds from left to right. This is a new wind condition, so we have to make a wind call. 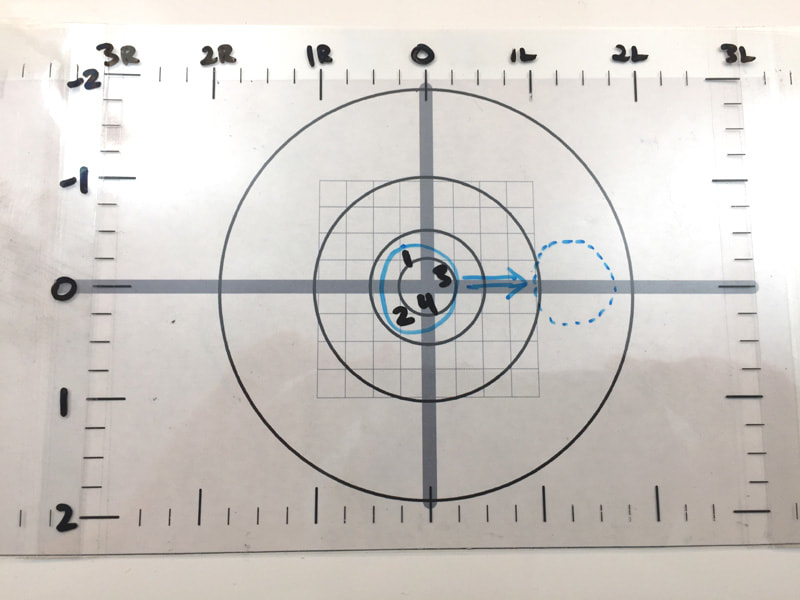 Instead of thinking in terms of a 1, 1.5, or 2 moa wind change, we use the plot as a visual reference and think about how the wind will shift the group as a whole. Based on experience, we imagine the round group might move as far as the dashed circle. We slide the plot sheet to the left, to position our best guess of where we think the bullet will go into the center of the target. 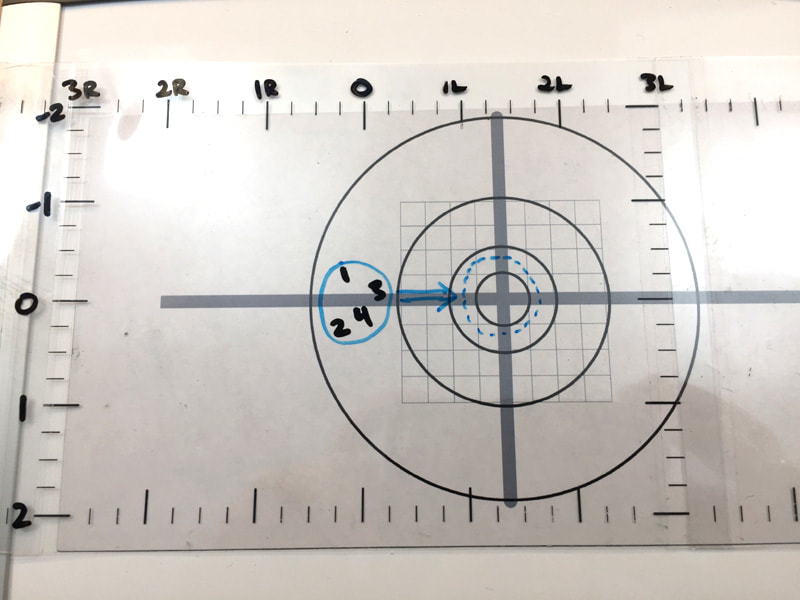 Seeing the original group relative to our new setting provides a sanity check that this decision is reasonable. The amount of adjustment isn't pulled out of thin air, it is made in the context of the size of the target and the group. With the plot in position, we read 1 3/8 Left from the windage scale, put that on the sight, and fire shot #5. 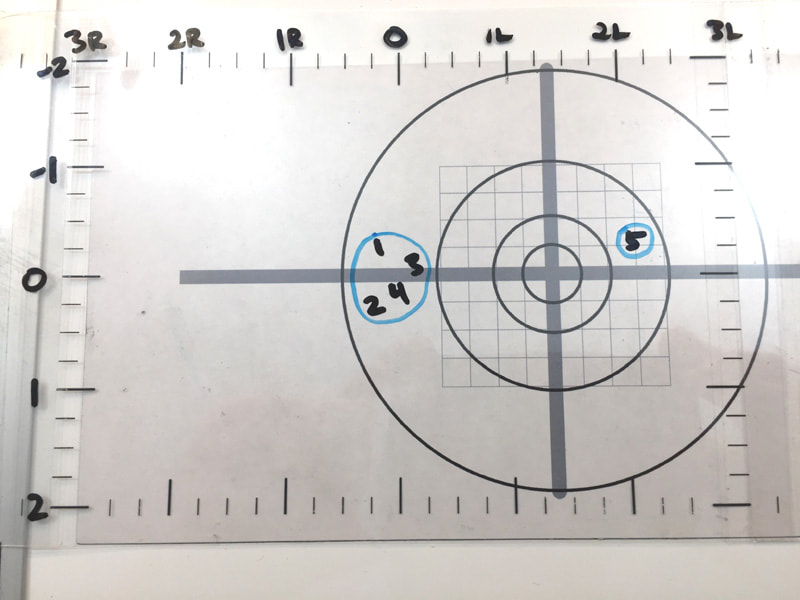 Wow! The wind was even stronger than expected. We lost a point, but it's OK. This shot tells us that the true wind condition was 2 Left, and we just have to reinterpret the wind indicators in light of this new information. 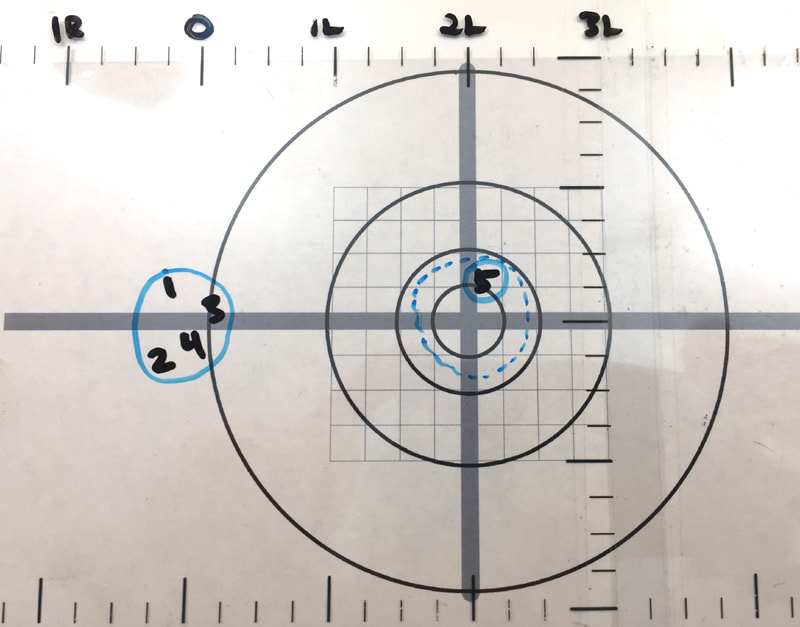 We can forget our previous wind call of 1 3/8 Left. That's old news. Now we just need to decide where the next shot will go, knowing that this one needed 2 Left. In the absence of any other changes, we might imagine the group centered around this shot. There are always many factors that go into the decision. Mirage, other targets, or the slightest gust of wind could nudge your estimate one way or the other. The key is to never be making wild guesses. Visualize the range of possible outcomes in the context of the plot, and then center that on the target. This will ensure that the adjustment you make is exactly as aggressive or conservative as you intend it to be. 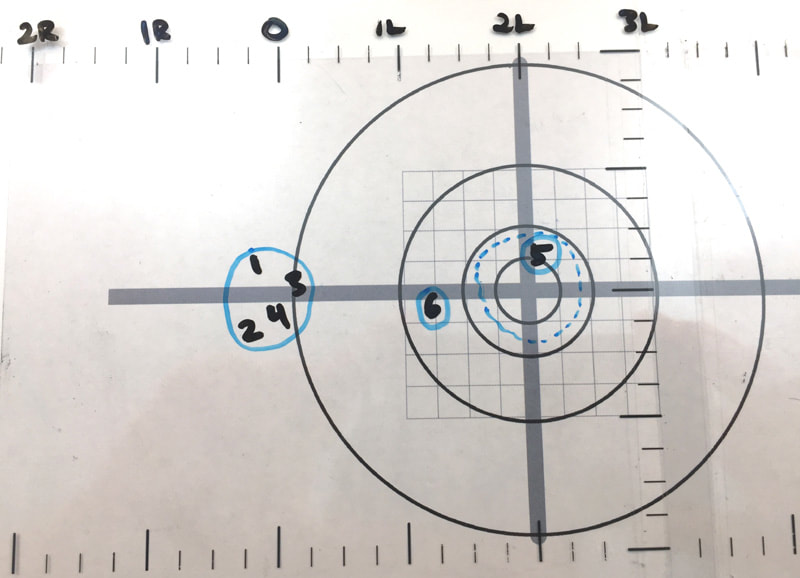 Oops! Looks like the wind died down and we missed it. Either that, or shot #5 was just a short-lived gust of wind. We have to interpret the wind indicators on the range and try to figure it out. Suppose we notice that the flags have lowered slightly, which explains why #6 is to the left. Now we have a story that makes sense. We might imagine a relation between the plot and the flags that looks something like this: 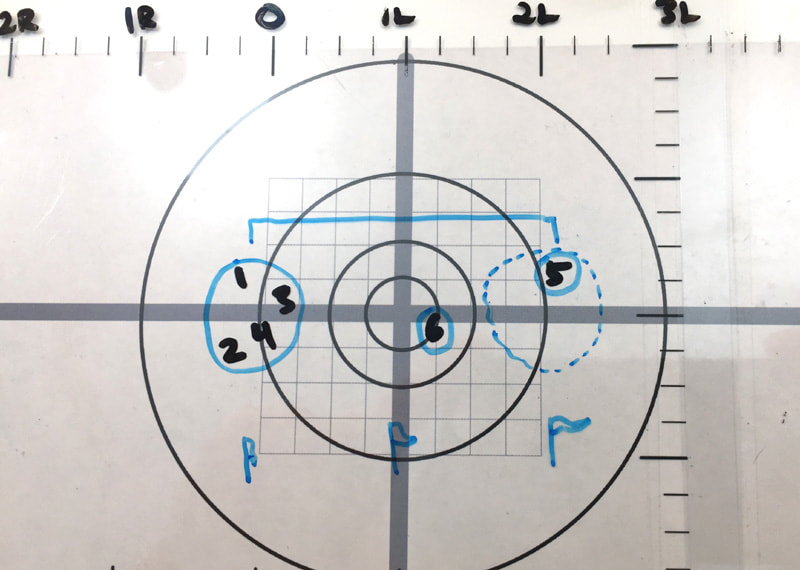 Until something odd happens, this is our working theory. We might refine it as a few more shots come in, but in general, we can make confident decisions keeping in mind this mapping between flag appearance and position on the plot. 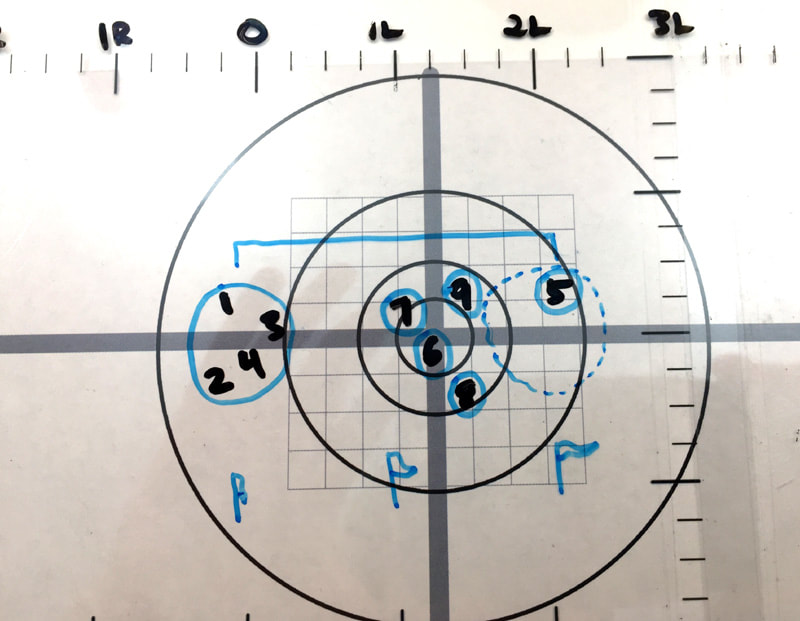 Shots #7, 8, and 9 generally form a group around #6. We might have made adjustments on every shot, or we might have left the sights alone. In any case, the plot is telling us that the true wind condition is fairly stable. After every few shots, it's important to look back at the plot with an open mind, and try to identify a pattern you might have missed. The sooner we recognize that we have a stable wind condition, the sooner we stop making micro adjustments and over-complicating the situation. Your plot is your sidekick. It records the true wind conditions on the range, does all the calculations for you, and has a perfect memory. It will make sure you never make any truly terrible decisions. When you start to feel lost, it will be there, ready to show you the way. The plot has your back, so you can focus on everything else. Fitting the plot into your routineIf you've been shooting for a while, you have a routine. You think a certain way, you shoot at a certain pace, and your methods are practiced. Your routine is how you avoid silly mistakes. If you really want to mess someone up in a competition, give them some advice. Your routine is also probably pretty similar to how others around you shoot. We tend to learn through experience, and as a result, methods common in one country might be completely different than in another country. Plotting is worth it. Trust me. Whether you are just starting out or highly successful in competition, there is no better way to improve your score. It will also help you become a better wind reader. If you plan to continue shooting for more than two years, you might devote the next year to learn to fit the plot into your routine in a way that you are comfortable with. The primary criticism of the method is that it takes too long. It's better to shoot fast through a stable wind condition. This is absolutely true. A bunch of shots plotted on top of each other are not providing any value. In fact, the plot can be used in many different ways. You can carefully design your shooting procedure to get the benefit of the plot without taking any time away from watching the flags and pulling the trigger. Suppose you have been watching the flags, the mirage, and other targets, and you're pretty much ready to make a decision. What do you do? Method 1: Adjust the plot before you shoot.
This is how you should learn. It takes the most time, but it's foolproof. Don't worry about speed; keep the plot accurate at all times and focus on learning how to make decisions using it. Once you are comfortable and not making mistakes, then modify your technique to improve speed. Method 2: Adjust the plot after you shoot. Make adjustments on the scope, but only update the plot after you shoot, while the target is down. This is a practical way to keep the plot in sync but not waste any time managing the plot when you should be thinking about the next shot.
This is the method I used at the Worlds. For this to work well, it's critical that you aim and fire quickly. When the wind is changing, it's more important to see the changes before you fire than to break perfect shots. Learn to adjust the scope without losing your aim. Then you can afford to click the scope before letting the shot go. Method 3: Hold off for small changes. The obvious weakness with the previous method is that it requires clicking the scope before pulling the trigger. This hybrid method lets you break quick shots without clicking the scope, while also keeping the scope in sync with the plot.
Only hold off for adjustments from the previous shot, and then immediately translate those corrections into scope clicks. The plot will remain accurate. When the wind makes a sudden change, you will have some time, so go ahead and make larger changes on the scope. Method 4: Hold off for almost all changes. If you are dead set on holding off on the target, then this method is for you. 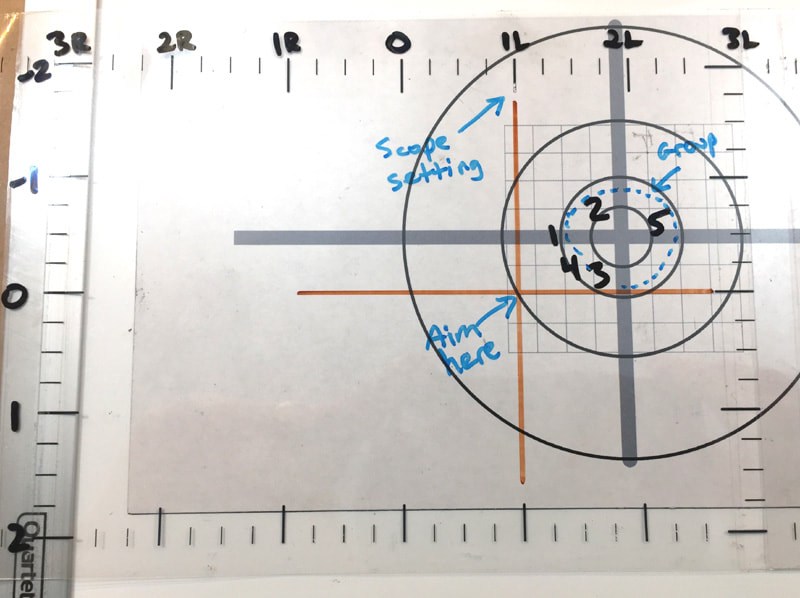 Decide on your initial scope setting, in this case 1 Left, and draw a crosshair on the plot at this position. This is your aim point. Shift the plot as needed and simply aim where the crosshair is pointing. If the wind changes and you need to adjust the scope, erase that crosshair and draw another one where you are setting the scope. You can draw a smaller X so that it is easier to erase and redraw. Technically, this method is equivalent, but you must ensure your plot sheet is printed accurately and you aim exactly where you should in both elevation and windage. Other tips When you need to shoot fast, and the wind isn't changing much, there's no benefit to plotting every shot on top of each other. You can simply draw a circle representing a group at a specific wind condition and just keep shooting until something changes. You can also use dots instead of numbers. This encourages you to treat every shot equally instead of valuing only the recent shots. Although, it can make it harder to follow wind changes over time. You must be able to trust the tracking in your scope. If you suspect your scope is not tracking, go to the range and test it, and send it back for repair. Your scope is a critical piece of your equipment, and if it's not working properly, then it becomes your limiting factor whether you adjust it every shot or only every 5 shots. The key value of the plot is to have all the relevant information you need at the worst of times. However you choose to use the plot, make sure you are getting the benefits when you need them most, and not just making it easy on yourself in the typical case. Real world examplesI use a plot which is 16" wide, and I have 8 moa on either side of center to work with. Depending on the conditions you normally shoot in, you may need more or less resolution and range. The larger your grid, the easier it is to plot accurately and adjust quickly while shooting. However, if the wind changes exceed the limits of your plot sheet, it can create an awkward scenario. Here are some real-world examples of my plot sheets. Try to follow the numbers in order and you will see how the true wind conditions were changing on the range. Imagine the adjustments that would be needed to save each point. The sighters are labeled A and B, and the first on score is 1. Along the top is the score. Remember the actual shot impact on target is not recorded, only the true wind condition, so the score will only give you a rough idea of whether I was able to correctly adjust for each shot.  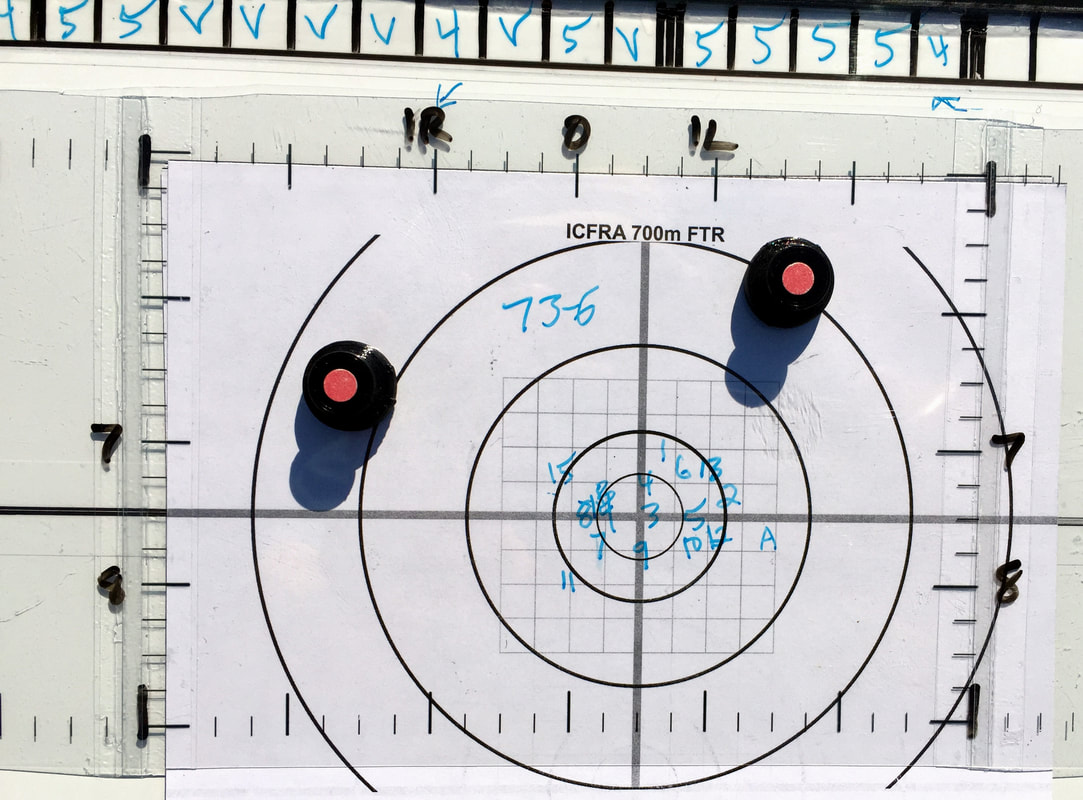 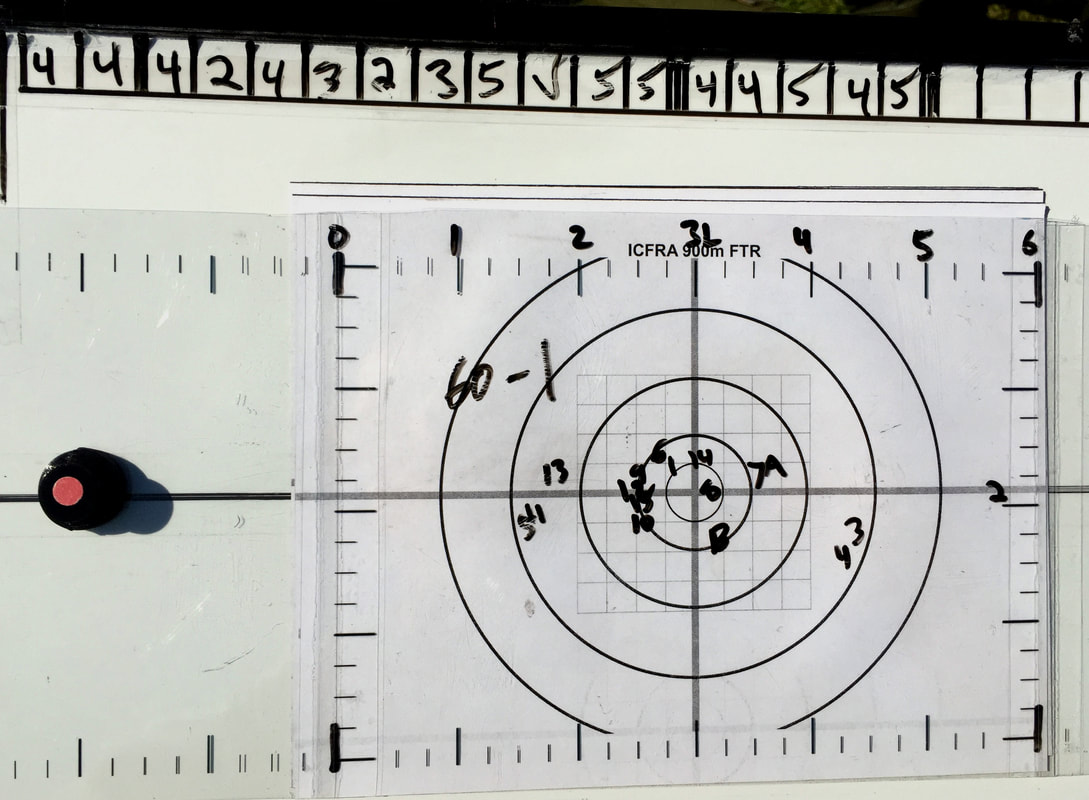 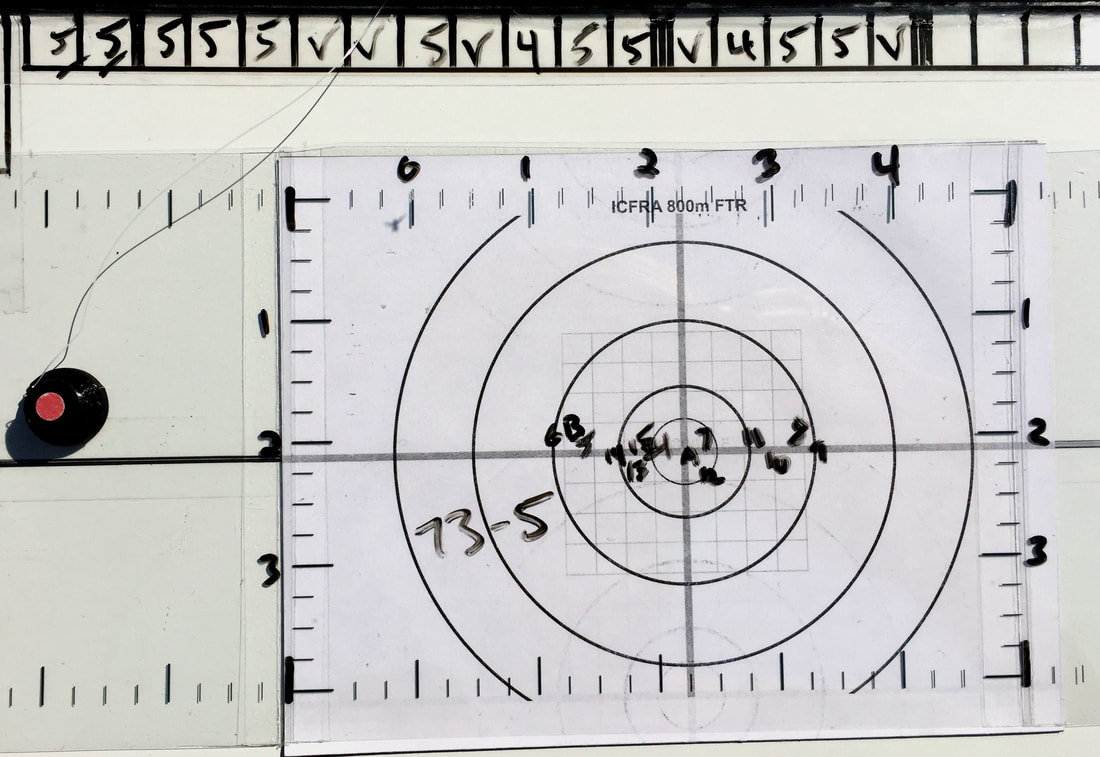 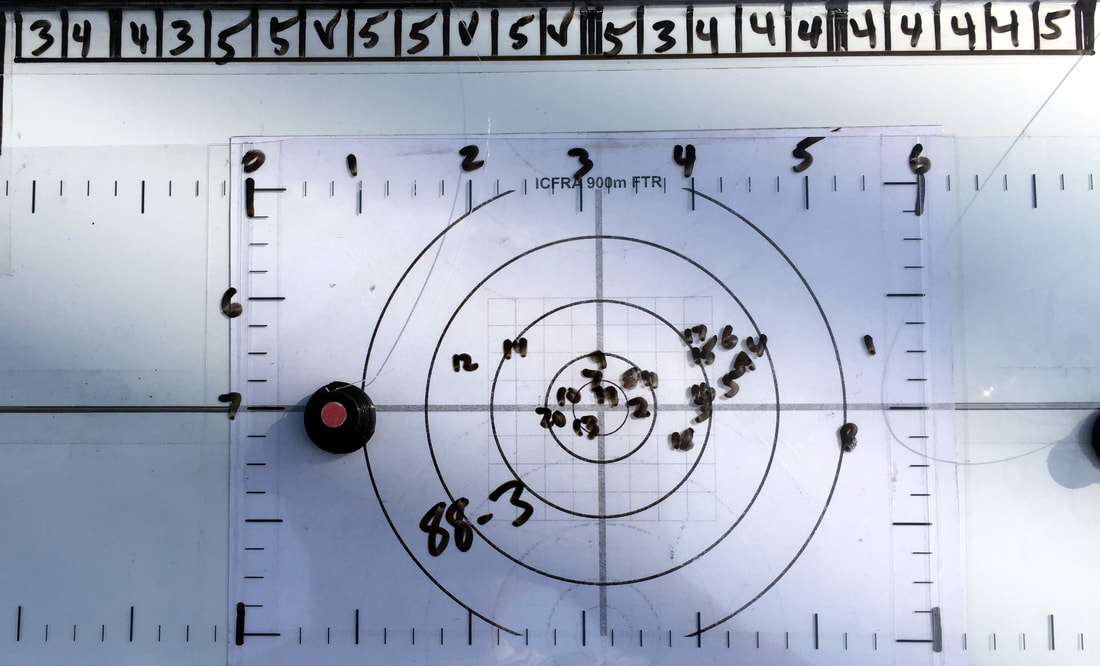 The wind conditions can vary wildly on the range, and you never really know what's going to happen once you start shooting. There might be 3 or 4 challenges that present themselves during a string, some involving the flags, others the mirage, and others where you have to simply center and hope for the best. The plot brings all situations down to a common reference frame. Every shot is approached the same way: decide where you think the next shot will go relative to everything that happened so far. You'll save a few points from precise group centering, a few points from better interpretation of the wind, and a lot of points from avoiding a train wreck. ConclusionIf you've come this far, I hope I've convinced you to give it a shot. Start by practicing the basics. Then focus on designing a routine around the key benefits of the method, not trying to cram a plot into your existing routine.
There is only one commercially available plotting tool on the market that I am aware of (EZ-Graf) but I would not recommend it for F-class. Here is an easy way to build your own:
While these concepts may be applied in various ways, I'm convinced it will improve the level of competition in the sport over time. Approach with patience; it won't become natural overnight. After plotting for three years, the thinking process is second nature to me, but I know I have practical weaknesses in my routine and I'm still trying to find ways to optimize.
17 Comments
Dad
1/6/2018 07:16:03 pm
Excellent article. Thanks for posting this Adam.
Eric C
1/6/2018 08:47:04 pm
Well done and very useful!
Wayde Clifford
1/7/2018 04:15:13 pm
Very well explained.
Jon L
1/8/2018 05:02:58 pm
Nice article - thanks
Gerhard Hamman
1/10/2018 02:05:11 am
A very clear and precise article. I am waiting on a new plotter being designed and fabricated here in South Africa but will use the above in the interim.
Bob D
1/21/2018 05:26:22 am
Excellent read and very informative looking forward to more of your posts.
Eric C
2/1/2018 08:49:11 pm
Have you looked at producing an app that would let a shooter set the range, etc. and input shots to make this process amenable to iPads or other tablets?
Eric Christianson
2/6/2018 12:16:55 am
Adam, love your stuff and this post is awesome.
Vlad
3/27/2019 11:55:05 am
I made such an app. Called Fullbore.
Chris
3/18/2018 12:26:02 pm
How would you set up a plot board in military sniping terms where we shoot on unknown distances? I would like to see the spotter incorporate this into their routine. Mainly we just plot shots and annotate what the call was and where the shot landed, but I feel we really don't gain anything from it as your method seems to help in having a successful follow up shot.
Adam
3/19/2018 06:46:22 pm
The concept should carry over. You don't actually need to know the distance, as long as you are able to estimate the impact location of your shot in terms of minutes/mils from center. Plot shots in minutes, make adjustments in minutes, and the plot will keep track of it all for you.
Robert Glacken
8/3/2018 08:30:34 pm
Adam what bipod are you using?
Milton
1/28/2019 11:54:51 am
Adan,
Dave Harry
7/10/2019 04:07:37 pm
Hmmmm, looks familiar. Excellent article Adam!
Richard
5/31/2020 12:16:22 am
Thanks very much Adam. Fantastic, this will be a great help, finally I can make some sense out of what to dial in, will put it to practice next week. Greetings from Aus
Dave
9/13/2020 03:03:57 pm
Looking forward to test driving this method thanks for posting this info Leave a Reply. |
Who am I?Adam MacDonald: Canadian FTR shooter, inventor, problem solver. Archives
May 2019
|
 RSS Feed
